A useful apron starts with an ordinary question: what do you want to do while wearing it? Someone making dinner may want a place for a timer and a recipe note. A gardener may care more about accessible pockets. At a workbench, the difference between an open pocket and a divided one can matter more than the color. Begin with that task and the rest of the choice becomes easier.
Our canvas range gives you three starting points: classic 16 oz cotton canvas, a lighter 12 oz water-repellent style, and a 16 oz tool apron with a different storage layout. All use cross-back straps. They share a practical purpose, but fabric weight, finish and pockets are separate decisions. This guide helps you work through those decisions without treating one apron as the answer to every job.
Start with the task, then the apron.
Think about the last time you wanted an apron. Perhaps you were leaning over a mixing bowl, carrying small tools between a bench and a shelf, or moving from a coffee machine to a sink. List the two or three things that would have helped: coverage at the waist, somewhere for a pencil, or straps that did not loop around your neck. Those details are a better shopping list than a general promise of toughness.
Also think about where you will wear it. A kitchen counter, a garden table and an art studio can involve different kinds of mess. An apron used with paint or workshop materials should have its own role; keep it separate from the one you wear while preparing food. If your task requires specific protective equipment, choose that equipment for the hazard. Ordinary cotton canvas is everyday workwear, not a substitute for certified protection.
Now look at your routine between tasks. Will you take the apron off several times, sit down at a table, or work over a jacket? These small transitions help you judge the straps and coverage. A photo can show the apron’s outline, but it cannot decide how much fabric you like around your legs or how you prefer to tie the waist.
What 12 oz and 16 oz tell you.
The ounce figure describes fabric weight, not the total weight of the finished apron. In our range, 12 oz cotton canvas is the lighter choice and 16 oz is the more substantial one. That distinction gives you a useful starting point, but it does not describe every part of the experience. The apron’s size, straps, trim and whatever you put in its pockets also affect how it feels.
Consider a lighter apron if you want less fabric weight while preparing food, serving coffee or working at a craft table. Consider the classic 16 oz line if you prefer a substantial canvas body. Neither choice automatically wins for every person or season. Think about your layers, the temperature of your workspace and how long you usually keep an apron on.
Weight should not be used as shorthand for waterproofing, heat protection or stain resistance. Those are different properties. A heavier cotton fabric does not establish any of them. Compare the stated finish separately, and avoid turning an apron’s workwear appearance into a promise about hazardous jobs. For ordinary cooking and making, the useful question is how the fabric and fit suit your routine.
Canvas and its finish are separate choices.
Our classic line is cotton canvas. The 12 oz water-repellent range and the canvas tool line add a water-repellent finish. That finish is relevant when small splashes are part of a task, such as working around a preparation counter. It does not make the apron waterproof or turn it into a barrier for hot liquids, chemicals or prolonged wet work.
Choose a finish because it answers a real need. If your usual apron mostly catches dry flour or a little soil, pocket placement and fit may lead your decision. If you regularly work near water, a water-repellent style may be a more useful starting point. You should still deal with spills promptly and follow the care instructions on the garment.
Do not assume a water-repellent apron is waxed canvas. The terms describe different things, and they can call for different care. Before applying any treatment or choosing a wash routine, check the actual label. A familiar-looking fabric is not enough evidence to borrow cleaning advice from a different product. The simplest approach is to keep the label and use it as your first reference.
| Detail | Classic canvas | Water-repellent | Tool aprons |
|---|---|---|---|
| Canvas weight | 16 oz | 12 oz | 16 oz |
| Fabric | 100% cotton | 100% cotton | 100% cotton |
| Finish | Classic canvas | Water-repellent | Water-repellent |
| Storage | 3 front pockets | 3 front pockets | Tool compartments + side loops |
| Straps | Cross-back | Detachable cross-back | Cross-back |
| A useful starting point | Cooking and grilling | Prep and coffee | Hand tools and studio work |
Compare coverage using garment measurements.
An apron’s length and width describe the piece of fabric. They are not body measurements. The most useful comparison is often an apron you already enjoy wearing. Lay it flat, smooth it gently without stretching it, and measure the body from the top of the bib to the hem. Then measure the width at the same points shown in the product diagram.
The classic and 12 oz water-repellent diagrams show a body length of 31.5 inches, an upper width of 27 inches and a hem width of 26 inches. Those two width figures refer to different places, so they are not interchangeable. The straps extend beyond the body. When you compare an apron of your own, make sure you are not including the ties in a measurement intended for the canvas panel.
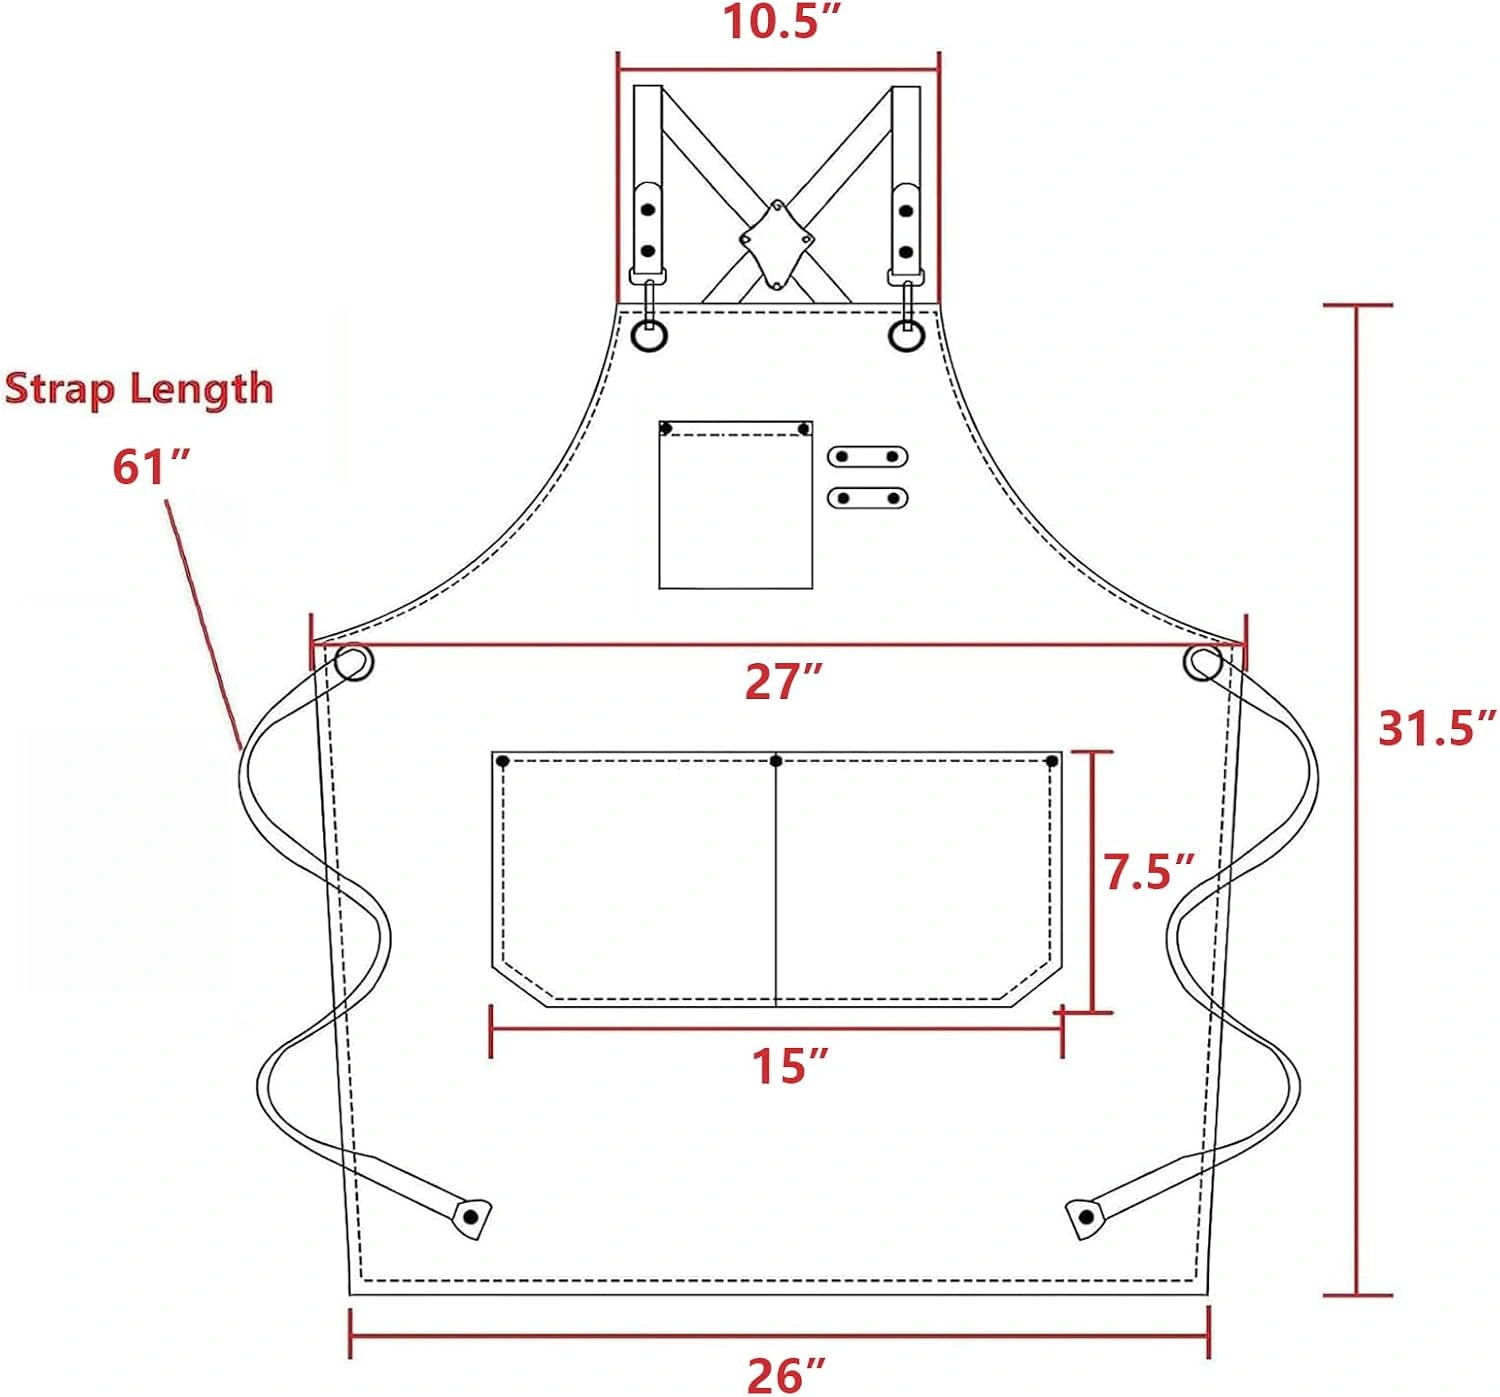
Check where you want the bib and hem to sit. Raising the bib changes the lower coverage, while lowering it may put the chest pocket farther from your hand. Your height, the clothes underneath and your preferred coverage all matter. The M–XXL guidance on an option is a useful clue, but it does not replace a personal check against a garment that fits.
If you expect to sit while wearing the apron, include that in your comparison. A potter, painter or person working at a low table may use the apron differently from someone standing at a counter. Try the motions you actually make: reaching forward, stepping sideways, bending and sitting. Look for a comfortable range of movement before putting anything in the pockets.
Set the cross-back straps in a sensible order.
Cross-back straps travel over both shoulders and meet or cross behind you. They avoid a single loop around the neck, but they still need adjustment. Begin with empty pockets and the clothing you expect to wear. If the straps have twisted, flatten them before changing their length. An uneven strap can make the apron feel crooked even when the waist ties are tight.
Set the bib height first. Bring the two sides level, then adjust the waist ties so the apron stays close without restricting movement. Check the strap position in a mirror or ask someone to look at the back. The aim is an even arrangement that stays where you expect it when you reach, rather than the tightest possible fit.
After the first adjustment, put only your usual small essentials in the pockets and move again. A loaded pocket can change how the apron hangs. If you keep adding items to compensate for storage on the bench, pause and remove what you do not need. Keep loose ties secured and away from heat or moving equipment. Comfort and a clear working area matter more than carrying everything.
Choose a pocket layout, not just a pocket count.
Three large open pockets and three small compartments would solve different problems, even though the count is the same. Our classic and lighter water-repellent aprons use a smaller chest pocket and two larger lower pockets. That arrangement gives a compact item its own place while leaving the lower area for things you need to reach easily.
The tool line has a divided storage layout and side loops. Look closely at the photos and imagine your own small tools in those locations. Consider the shape of each item, how often you reach for it and whether it could catch when you bend. Do not judge capacity only from a staged photo: phones, tools and notebooks shown there illustrate the pockets and are not included with the apron.
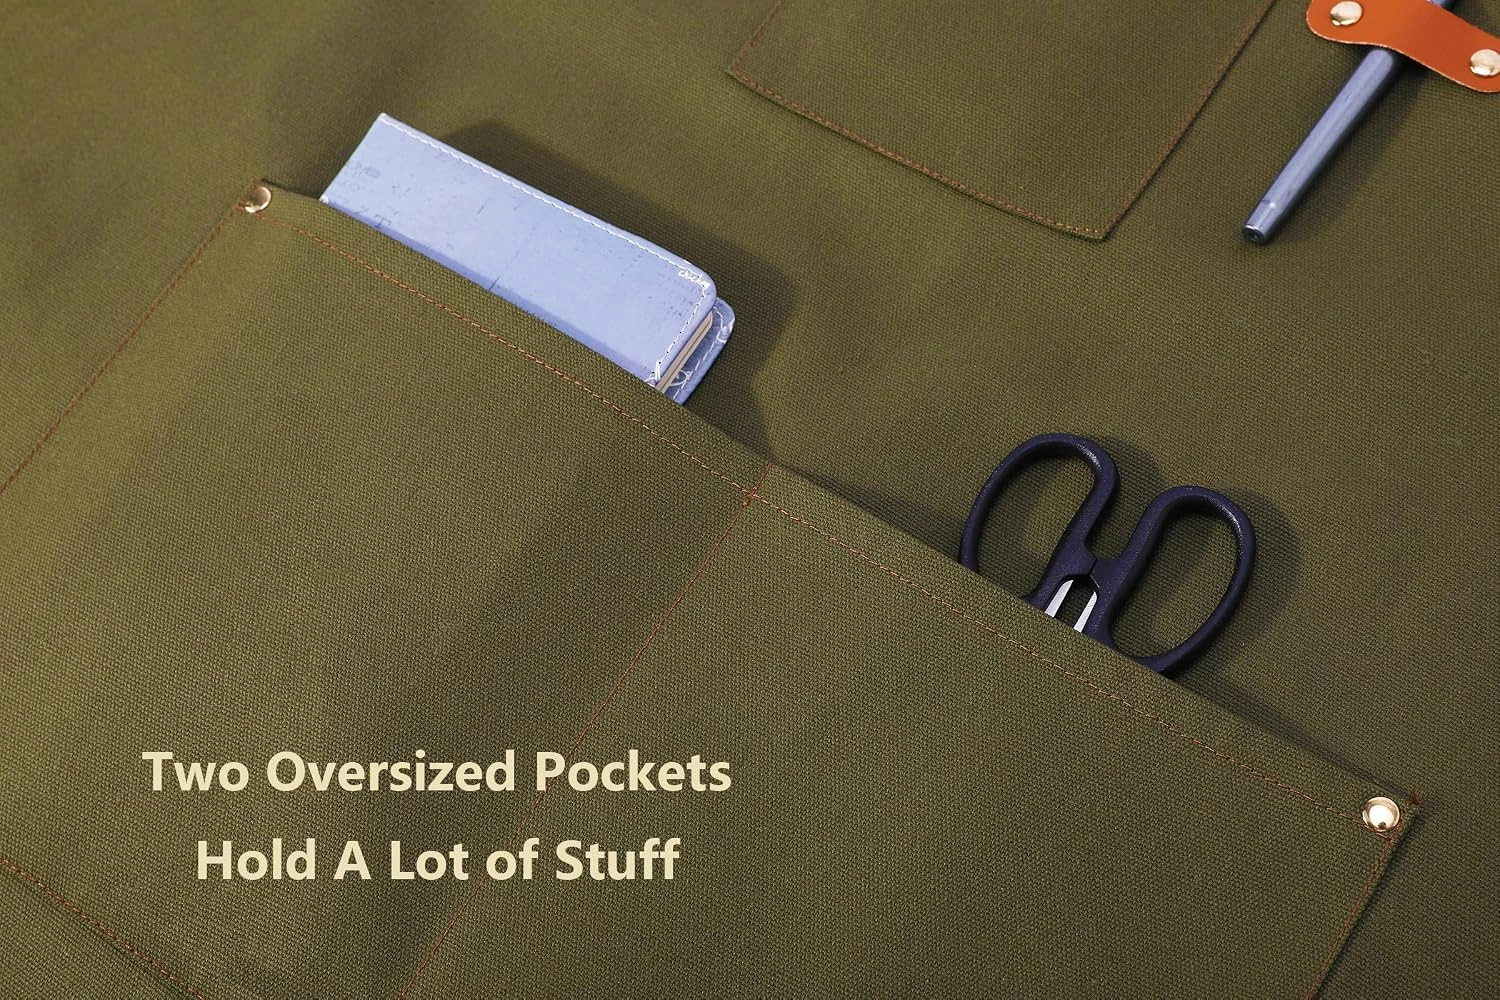
Start with a short list. In the kitchen, that might be a timer and a folded recipe note. At a drawing table, it might be a pencil and a small notebook. Keep sharp or awkward items in a suitable holder, and leave anything that makes the apron pull heavily on one side on your work surface. Pocket space is useful when it supports the task without getting in the way.
Pay attention to the pocket openings as well as their size. You should be able to see or feel where an item goes without repeatedly looking down. Check the placement after adjusting the straps; a pocket that looks conveniently positioned in a flat photo can sit differently once the apron is tied over your clothes. That is another reason to make fit decisions before filling the apron.
Choose a color you want to reach for.
Color is a practical preference as well as a visual one. You might want an apron that sits quietly alongside the clothes you already wear, or one that adds a clear accent to the kitchen. Our classic range includes neutral, dark and brighter colors. The lighter water-repellent and tool lines have their own selections, so compare colors within the style you want.
Do not assume two products called brown will look identical. Fabric, finish and lighting affect the appearance of a color. Our brown 12 oz water-repellent apron has a golden cast, while the classic brown has a different workwear tone. Open the selected product’s gallery and look at its close views as well as the lead image before deciding.
A dark color does not remove the need for cleaning, and a light color is not a care instruction. Choose a shade you like, then follow the same routine of checking and cleaning the apron after use. Screen settings and the lighting in your room can change how photographs appear. Confirm the named option in the purchase tab so the color you intend to order is the one selected.
Build a simple care routine around the label.
Care begins before the apron reaches the wash. Empty all pockets, including small compartments that might hold a pencil or folded paper. Remove loose debris and check the straps and clips. Long ties can tangle, so secure them in the way recommended for your garment. If the model has detachable straps, consult its instructions before removing or washing them separately.
Use the care label for wash temperature, drying method and ironing. Advice for a different fabric or finish may not apply. Professional apron maker TILIT makes the same useful point in its care guidance: “Always follow the specific instructions on each garment’s care label.” Read TILIT’s published care guidance. The instructions attached to your own apron remain the relevant ones.
Keep similar colors together and avoid experimenting with a strong treatment on the most visible part of the bib. If you need to address a stain, check which products the garment instructions allow. An apron that has been used with workshop materials may require handling appropriate to those materials. Keep that cleaning routine separate from the one for food-preparation clothing.
Let the apron dry fully before folding or hanging it away. Check the pocket seams, clips and ties periodically, especially if you tend to carry heavier items. Notice a loose part before the next task instead of waiting for it to interrupt you. A short check while putting the apron away is easier to remember than an elaborate maintenance schedule.
Make the apron part of a useful workspace.
At a kitchen counter, start by deciding where the apron will hang and where the items you use most will sit. The pockets can hold a few essentials, but the work surface should still do most of the organizing. Keep clean food-preparation items apart from things brought in from the garden or workbench. Change or clean clothing as the task requires.
For coffee preparation, think about movement between the machine, sink and serving area. A lighter apron with accessible front pockets may be a useful choice, but pocket contents should not crowd the counter when you lean forward. Set the straps before you begin, and keep ties contained. An apron should become part of the routine without creating another thing to manage.
At a studio table or workbench, arrange the tools on the surface first. Then decide which small items really belong on the apron. The tool line’s compartments and loops offer options; they are not an invitation to carry the whole kit. Keep anything awkward, heavy or unsuitable for a fabric pocket in its proper storage. Revisit the arrangement when the task changes.
After using the apron for a few sessions, notice what you keep changing. If you always shorten one strap, reset both sides together. If a pocket holds items you never reach for, leave them out next time. Small adjustments based on your actual routine are more useful than filling every compartment because it is there. Keep a comfortable setup simple enough to repeat when you put the apron on.
Giving an apron without guessing everything.
An apron makes a more thoughtful gift when it reflects what someone likes doing. Start with the activity you know: baking, gardening, drawing or making coffee. Then think about their preferred colors and the clothes they tend to wear. That gives you a grounded starting point without needing to imagine a completely different routine for them.
Fit is the part that deserves the most care. If you can compare an apron they already own, use its garment measurements. If you cannot, review the product’s dimensions and the return terms before ordering. A size range is not a personal fit guarantee. Keep the label and packaging available so the recipient can try the apron and decide how it sits.
Check exactly what is included. Our selected products are individual aprons; the items placed in pockets in the photographs are props. Do not assume a displayed tool, phone, pen or accessory comes with the purchase. Confirm the color and quantity in the purchase tab, and use the delivery estimate shown for the destination rather than planning around a general expectation.
A final check before you choose.
By this point, your choice should be fairly simple. You know the kind of task, the canvas weight you prefer and whether the water-repellent finish is relevant. You have compared the pocket layout and looked at the selected color. The last useful step is to check the fit information against your own routine and confirm that the product page describes the option you mean to buy.
- Fabric weight and finish suit the task.
- The pocket layout fits the small items you actually use.
- Coverage and strap adjustment work over your usual clothes.
- You have checked the selected color and included quantity.
- The purchase page’s final price, delivery and return terms work for you.
Our displayed prices are checked snapshots. Open the chosen apron with its purchase button and confirm the current details in the new tab before placing an order. For a broad overview, return to the style comparison. If you already know the fabric and pockets you want, browse the colors and choose the apron you will enjoy putting on.